Thursday, July 28, 2011

Basic Sewing: How to read a pattern tutorial-PART 2


Pattern Instructions and Pieces:

Notions and Fabric to Buy: A list of types of fabrics that work with pattern. A list of notions needed (ex: zipper, elastic, lace, ribbon, etc.). A list of quantity of fabric (and lining and interfacing) based on body measurements
DSCN5289
· Front and Back images – Shows a drawing of what each finished garment will look like from front (bigger images) and back (smaller images)
front and back views M5847
· Pattern pieces – images on instructions that explain which pieces will need to be cut from paper depending on which pattern you are doing (ex: which pieces go with style D)
Pattern Pieces
· Cutting Layout – indicates recommended placement of pattern pieces on fabric when you’re ready to start cutting out the fabric.
cutting layout
· Cutting line – Different lines indicate cut for a different size (stated on the lines)
cutting lines
· Seam Line – Typically 5/8th inch from the cutting line, unless otherwise specified in pattern directions
· Hem Line – Fabric folded on itself (folded twice to enclose raw edge) at points where fabric end is not connected to another pattern piece (ex: ankle of pants, cuff on simple sleeve, bottom edge of skirt, etc.)
· Grain line – This line needs to be exactly parallel to the selvage
grainline_thumb
· Fold line – Indicates where fold of fabric needs to line up
fold line_thumb
· Notches – Triangles that you cut outside of pattern so that you can match up separate pieces when preparing to sew
notches_thumb[1]
· Dots – Points of interest that are explained in each pattern (ex: where to stop sewing for zipper opening, where to place corners of pocket piece, dart sewing start and stop, etc)
dots_thumb

Wednesday, July 27, 2011

Summer Reading Suggestions


These are some books that Clarissa and Lora enjoy. If you are in need of a good read and a pleasant escape, here's a great place to start. Feel free to ask for more detailed descriptions or recommendations. Happy Reading!

Sweet Whole Wheat Bread

Today I will be showing you how to make Sweet Whole Wheat Bread, but before I do that let me say a few things first.

If you have any questions about grain mills, where to buy the cheapest ingredients, or anything else, please feel free to contact me for more information.

I would love to show you how to make bread from scratch (It’s so much easier to learn how to make bread when you can see and feel it)…but I don’t use my oven during the summer because it heats up our apartment too much (I have an oven from the 70’s and I swear it has no insulation) and I don’t turn on the swamp cooler either to save on electricity costs.
However, I would love to make a trade with you...I will show you how to make bread and even give you a loaf if I can use your oven to cook it.
If you think this is a good trade, please call or email me. I LOVE making bread and I’m sad that I am unable to do so right now.

I also make regular whole wheat bread, anadama bread, rose bread, bagels, pretzels, and rolls. I’m still trying to perfect hamburger buns.

-Tara

Sweet Whole Wheat Bread (Detailed Instructions)
10 cup whole wheat flour
2,000 mg vitamin C
6 cup water
1 1/3 cup olive oil
1 1/3 cup honey 1/4 cup SAF instant yeast
1/4 cup vital wheat gluten
7 cup whole wheat flour
2 Tbs salt

Procedure
1 In a grain mill, grind 9 1/4 cups of hard white wheat and 2,000 mg vitamin C (this is the flour you will be using).
2 Place 10 cups of whole wheat in the Bosch and add the water. Place lid on the Bosch and mix on speed 1 until flour and water are combined (about 15 sec).
3 Turn off the Bosch and add olive oil, honey, SAF instant yeast, and vital wheat gluten. Place lid on the Bosch and mix on 1 for 2 min.
4 Place splash ring on the Bosch and mix on speed 1, and add whole wheat flour a little at a time until dough pulls away from the sides of the bowl. When Bosch starts to whine a little and have a harder time mixing, increase to speed 2.
5 Add salt and knead for at least 10 min on speed 2. This makes the smooth and elastic.
6 While dough is kneading prepare for these next steps.
7 I like to use a silicone baking liner to place my dough on, but you can also spread oil on a jellyroll pan. I don't recommend using flour because it tends to make the dough dry and stiffer.
8 Divide dough into 4 parts. I like to weight my dough so that I know I'm dividing it evenly.
9 Slam dough onto pan repeatedly to get out air bubbles. Shape into loaf, and place seam side down into greased 9x5" bread pan.
10 Heat the oven up to Warm. Turn off the oven and place your loafs in uncovered. Let rise until double, about 40 min (the dough will slowly pop back out when you poke it with your finger)
11 Bake at 350° for 15-20 min (160° internal temperature)
12 Remove from pans immediately and place on cooling rack.
13 Wipe pans clean with a rag. Washing them causes them to rust and deteriorate faster.
14 When loaves are room temperature, place in a bread bag.

Servings: 80
Yield: 4 Loaves
Preparation Time: 50 minutes
Cooking Time: 25 minutes
Inactive Time: 40 minutes
Total Time: 1 hour and 55 minutes
Nutrition Facts
Serving size: 1/80 of a recipe (1.8 ounces).

Recipe Tips
If it's raining or humid outside, put in one less cup of water
Done kneading when dough is elastic and pops back fast when you poke the corner with your finger (dough will start to rip is you over knead it)
Done rising when dough pops back slowly when you poke the corner with your finger
Stretch marks on bread means it needed to rise more
Stick thermometer in at an angle, not straight down
Frozen Dough: Take dough out of the freezer and place in the fridge overnight. In the morning take dough out of the fridge and place on the counter. When dough is room temperature (usually a couple of hours) shape into loaves and let rise. Cook as directed.

Bread Making Tips


SAF Instant Yeast:  (or SAF Instant Premium Yeast)

Facts:
  • Now you can use the yeast preferred by the World’s Top Professional Bakers. For over 125 years, Lesaffre has produced premium quality, high performance yeast that is now used by more Gourmet Chefs and Commercial Bakeries worldwide than any other yeast.
  • No need to "proof" or dissolve SAF; just add along with your other dry ingredients.
  • SAF-Instant Dry Yeast reduces the amount of yeast used in your recipe by 25% compared to Active Dry Yeast.
  • OR, Use in any recipe calling for active dry yeast; no need to adjust the amount, use just as the recipe says.
  • An incredible value: SAF Red instant costs 75% LESS than supermarket active dry yeast, AND works better.
  • Makes about 96 loaves of bread.
  • Gluten-free.
  • Instant Yeast, also known as "fast-rising" or "fast-acting" dry yeast, can shorten the rising time in traditional baking by as much as 50%.
  •  Instant Yeast is not recommended for use in refrigerated or frozen dough baking methods.
  • Keep out of direct contact with ice water.
  • RED STAR® Quick-Rise™, RED STAR® Bread Machine Yeast, SAF® Gourmet Perfect Rise, SAF® Bread Machine Yeast, bakipan® Fast Rising Yeast and bakipan® Bread Machine Yeast are all instant yeast products.
  • If your yeast is stored in the refrigerator or freezer, we recommend allowing the dry yeast come to room temperature before using.  (Let it sit about 30-45 minutes.)
·       Use liquid temperatures of 120°F-130°F (the normal 110º-115º seems to work as well).  Tip for Successful Baking:  (Using a thermometer is the most accurate way to determine the correct liquid temperature. Any thermometer will work as long as it measures temperatures between 75°F and 130°F.)  
  • Yeast activity may decrease if it comes into direct contact with salt or sugar.

Dry Yeast Storage Tips:
  • To prepare your dry yeast open packages for refrigerated or frozen storage:
  • Fold the package down to yeast level (this removes the extra air).
  • Seal with some tape or a clip before putting into storage.
  • If you have a large opened package, separate dry yeast into multiple zipper bags and push out any air before sealing.
  • Label bags with "Best if used by" date and date package was opened.

Shelf Life:
SAF Instant Yeast comes in vacuum sealed 1 lb. packages. The yeast is granulated and until the package is opened it feels almost like a solid brick because of the airtight vacuum seal. The packages are printed with the date of production as well as a "best if used by" date. The "best if used by" date is set 1 year from the date of production, and in doing this, SAF assumes that you open the package as soon as you get it and keep the entire opened package at room temperature. Instead, we recommend that you open the original container and pour a portion of it into a small resealable container to keep in your cupboard (not out in the light) for daily use (a babyfood jar works fine.) Then roll the top of the SAF container down, clip it so it doesn't unroll, and store it in your freezer. Kept this way, the yeast in the cupboard will be good for a least 1 year and the remaining yeast in the freezer will remain good for a minimum of 5 years. We know from experience that SAF yeast, stored frozen in a re-closed container, retains its potency for several years. If you have a small airtight container for the frozen yeast, that can be used in place of rolling and clipping the foil pouch. When you transfer more yeast to your cupboard container, that yeast will remain good for another year in the cupboard. Unopened, vacuum-sealed containers of SAF yeast stored in the freezer actually remain potent for 10 years or more.

Bread Machine Baking:
  • In bread machine baking, liquids should be used at 80°F. 
  • For regular cycle bread machines - use 1/2 tsp Instant Yeast for each cup of flour in your recipe.
  • For one-hour or express bread machine cycles - Instant Yeast amounts must be doubled or tripled; suggested liquid temperatures vary with machines - follow your manufacturer's instructions.

Instant Yeast can be dissolved in liquids before using, if desired:
  • Rehydrating Dry Yeast before using gives it a "good start" - the yeast feeds on the sugar allowing it to become very active and ready to work in your dough.
  • Water is recommended for dissolving yeast.
  • Dissolve 1 tsp sugar in 1/2 cup 110°F-115°F water.
  • Add up to 3 packets of yeast, depending on your recipe, to the sugar solution.
  • Stir in yeast until completely dissolved.
  • Let mixture stand until yeast begins to foam vigorously (5 - 10 minutes).
  • Add mixture to remaining ingredients.
  • Remember to decrease the total liquids in your recipe by 1/2 cup to adjust for the liquid used to dissolve the yeast

Dough Enhancer:

  • OR:  Grind 500mg Vitamin C tablets with your wheat.  (500mg per 3 cups of wheat flour.) 
Facts:
  • Dough enhancer gives the bread loft, is rises lighter.
  • Dough enhancer will help make fluffier baked goods, enhance the natural flavor, and increase dough strength and shelf life. It's perfect for…. *breads *pizza dough *cakes *rolls *scones *muffins *and much more. Add dough enhancer to your favorite recipes for...*softer texture *longer shelf life *better flavor *increased strength Ingredients: Whey, soy lecithin, Tofu Powder, Citric Acid, Dry yeast, Sea salt, spice blend, corn starch, ascorbic acid (vitamin C), natural flavor.

Vital Gluten Wheat Flour:

Facts:
  • Gluten is a natural protein in some grains, particularly wheat.  It is this protein which, when combined with water, make dough elastic and able to hold the gas from yeast and steam during baking which causes bread to rise.  Gluten Flour is made from hard wheat that has had both the bran removed (as in white flour), and the starch, leaving it with proportionately more gluten protein.  So much in fact, that the protein in Gluten Flour generally ranges about 75-80% (measured dry basis) – compare that with Bread Flour, with protein ranges of 12 to 14% protein. 
  • Gluten Flour is generally used in bread recipes where you need to boost the gluten content of the flour being used – whole wheat, for instance – or to give them gluten content, period – flours such as rye or soya, so that they can hold yeast gases and rise.  It can also be added to make very crusty bread or crusty pizza doughs. 
  • You generally only need Gluten Flour in small contents – for Whole Wheat Bread for instance, a few tablespoons is often called for.
  • Store refrigerated, or in a cool place, or frozen even – protein goes rancid, and there is a lot of it in Gluten Flour to go rancid.

Wheat Flour:

Note: 
  • Use Hard White Spring Wheat, you can use 100% wheat flour and it will still make a light loaf.  It has a somewhat higher protein value (stronger gluten) and a milder taste.
  • Grind and use immediately.

Temperature of bread when cooked minimum of 180º

Free Night Out


I've never gone, but I heard that Heartfelt Wall Hangings does a FREE craft project every month.  For July, they are doing a cute birthday block.  This could be for a fun girl's night out!
 

Saturday, July 23, 2011

Basic Sewing: How to read a pattern tutorial-PART 1

Simplicity 5561

 --------------------------------------------------------------------------------------------------------

Fabric:

fabric

· Selvage – Finished edge of fabric.

· Bias – Diagonal direction on fabric becomes vertical line on finished garment. Adds stretch and beautiful drape.

· Nap - Pattern pieces often require the “nap” to be in the same direction, or cut with the “right side facing. Paying attention to nap will avoid having “upside down” fabric in finished garment. *ex: directional prints, velvet.


· Interfacing: An iron-on or sew-on stiff fabric that adds weight and stiffness.


· Lining: Lightweight fabric that goes on the inside to hide stitching and can add weight.

Monday, July 11, 2011

Photo Tips for Selling Online

This is a re-post of an earlier post I did on another blog last year.  Follow the links to find the closest items from the respective shops!
I've been keeping my eye open for more photo hints - many of us have various types of products, so this suggestion is for smaller items. I believe, however, that these ideas can be applied to bigger items (like a full woman's outfit, etc). But it is catered to work for smaller objects. So pay attention, because this advice is great for:
  • Jewelry
  • Purses/Bags (handbags, pencil pouches, wristlets)
  • Small articles of clothing (baby clothes, shoes, gloves)
  • Small objects (camera, stuffed animal, seashells)
  • Soap, candles
  • Accessories (watches, headbands, hair flowers)
and the list goes on. I think this advice works for most of our shops, and can be helpful for many of our items.
Here are some hints from Bomobob on taking photos indoors. Especially when the weather outside isn't conducive to photographing! You can find the full forum entry here. I'll quote and include some of his photos, but I'd also recommend reading his words!
He says rather than buying a "Lightbox," a
"piece of cardboard and light bulb have always served me just fine. Here’s what I call my 50 cent lightbox:"
Doesn't look too expensive... Just a nice piece of poster board or cardstock. He tapes it to the wall and the floor to hold it in place. He said that the weather was dreary outside; making it perfect for his makeshift Lightbox.

Next, he says,
"Yup, a sheet of Bristol board taped to the floor and wall. And today was a perfect day to demonstrate; cold, cloudy, blustery, and quite dark. What you see there is what you get. Not very good light. Big deal.
"Enter the light bulb, or to be precise, the Ott bulb. These are cheap, easily available at hardware stores, and the best lighting invention since sliced bread. Even better in fact, since sliced bread has very little to do with photography. Take one table lamp, remove shade, screw in Ott bulb, and put on stairs. What a difference!"
He also compensated for the darkness by changing the F-stop exposure on his camera. If you don't know how to this on your camera, you can take care of it after the fact, in a Photo Editor, like Google's Picasa (which is free - so affordable!), or Adobe Photoshop. **In Picasa, you would adjust the light-exposure by clicking on the Tuning tab, and increasing Fill Light and Highlights.**
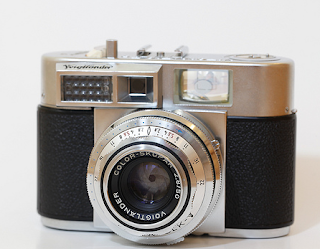
Here's a sample of how he used his easy-peasy light box:

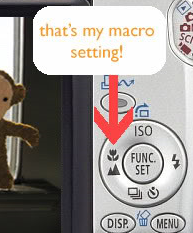
Doesn’t that camera look stunning? On this photo, he used the Macro setting, which looks like a flower. Here's someone's close-up of their macro button on their camera:Macro allows your camera to focus up-close and to allow the background to blur a little. You can increase the amount of blur in your photo editor. ** In Picasa, you can select Soft Focus under the Effects tab. It's not the most fancy way to blur out the background, but for some pictures it's the perfect touch.**
Another Etsy Blog article shows some great images that may inspire you on new, exciting ways to present your items. Avoid using flash, as Janae says, using flash is a great way to “murder” your photos.
Here are some more great ones from our the LDS Members on Etsy Team! Thanks for presenting your images so beautifully! These are the kinds of photos that work for Etsy's Treasuries and Front Page and Blog articles:
Honeyed Tones by Flores Del Sol
------------------------------------------------------------------------------